In an era of heightened sustainability, upcycling furniture has become a leading DIY trend in the UK. Instead of sending old, tired pieces to the local tip, savvy DIYers are using a bit of “elbow grease” and creativity to transform second-hand finds into bespoke statement pieces for their homes.
If you have a wobbly side table or a dated wardrobe that has seen better days, here is how you can start your first upcycling project.
Why Choose Upcycling?
Beyond the obvious environmental benefits, upcycling allows you to own furniture that is completely unique. Most modern “flat-pack” furniture is made of MDF, but older pieces found at car boot sales or charity shops are often made of solid wood. By restoring these, you are preserving quality craftsmanship while saving a significant amount of money.
Essential Tools for Your DIY Kit
Before you begin, you will need a few basics. You don’t need a professional workshop; a garden shed or a well-ventilated kitchen will do just fine.
- Sandpaper: Various grits (80-grit for stripping, 120-grit for smoothing).
- Sugar Soap: Essential for cleaning off years of grime and grease.
- Paintbrushes: A mix of synthetic and natural bristles.
- Primer: To help your paint stick and prevent “bleed-through” from old wood stains.
- Furniture Wax or Varnish: To protect your hard work.
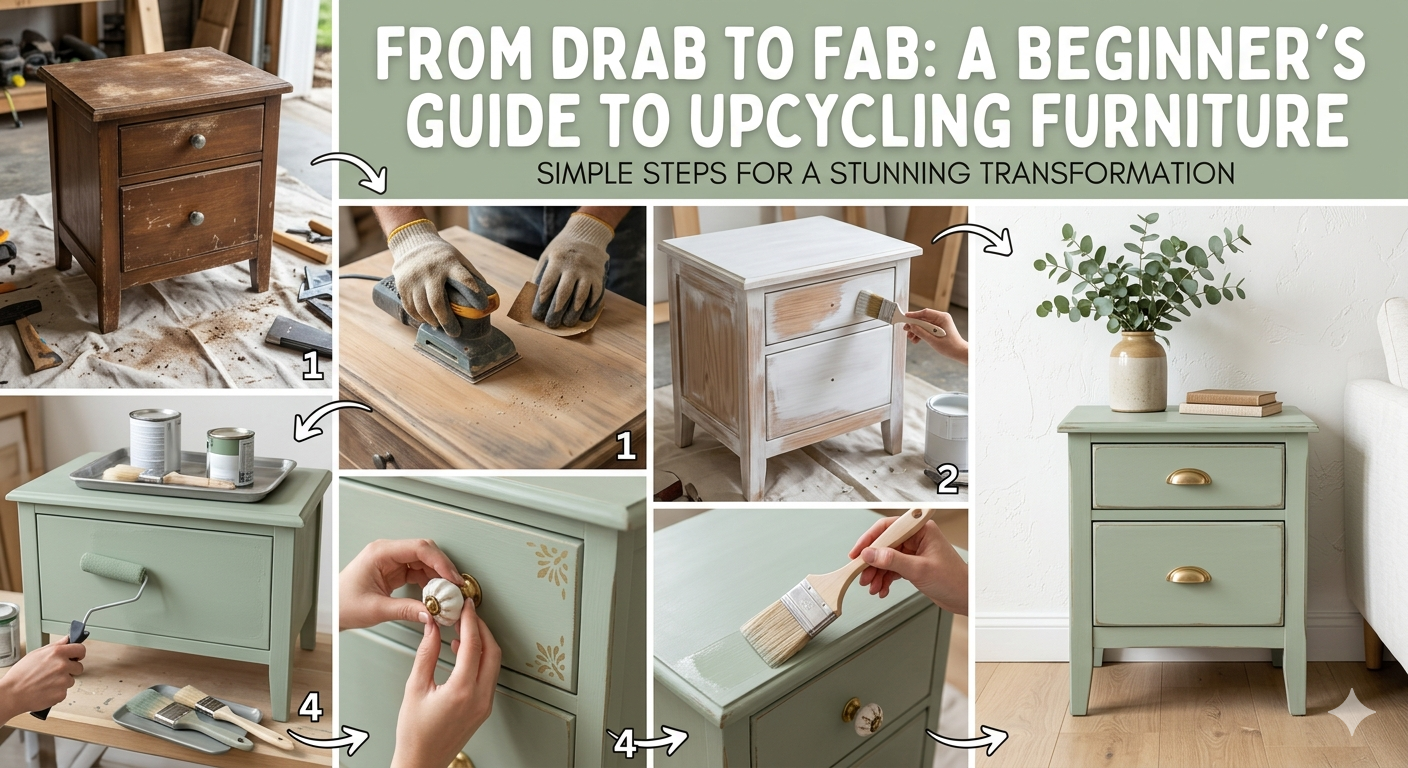
The Step-by-Step Process
1. Preparation is key.
The biggest mistake beginners make is skipping the prep. Start by cleaning the piece thoroughly with sugar soap and water. Once dry, give it a light sand to “key” the surface—this creates a rough texture that helps the paint adhere. You don’t need to sand it down to the bare wood, just enough to remove the shine.
2. Prime and Paint
If you are using a light colour on dark wood, a primer is a must. Once the primer is dry, it’s time for the fun part. Chalk paint is a favourite for DIY beginners because it is very forgiving, dries quickly, and often requires less prep work. Apply thin, even coats rather than one thick coat to avoid unsightly drips.
3. Adding Personal Touches
This step is where you can truly optimise the look of your piece. Consider changing the hardware—replacing old plastic handles with modern brass or ceramic knobs can instantly modernise a chest of drawers. You could also try techniques like “distressing” the edges with sandpaper for a shabby-chic look.
4. Protecting the Finish
Furniture in a busy household takes many knocks. To ensure your masterpiece lasts, seal it with a clear furniture wax or a water-based poly-varnish. This will make the surface wipe-clean and prevent the paint from chipping.
Where to Find “Diamonds in the Rough”
You don’t need to spend a fortune to find a project. Keep an eye on:
- Online Marketplaces: Look for “free to collector” items.
- Charity Furniture Stores: Often have high-quality solid wood pieces.
- Car Boot Sales: The best place for small items like stools, mirrors, and lamps.
Conclusion
Upcycling is a rewarding hobby that combines creativity with practicality. It’s about seeing the potential in something others have discarded. So, pick up a paintbrush, embrace the occasional smudge, and start transforming your living space one piece at a time!
Discover more from TheHubBuzz.com
Subscribe to get the latest posts sent to your email.